
Diaper Bag Essentials
- 2 days ago
- 3 min read
Updated: 16 hours ago
To the Point
Diaper-Changing Essentials: Pack diapers, wipes, rash cream, disposable gloves, small trash bags, and a washable changing pad.
Backup Clothing: Keep a change of clothes available for unexpected messes.
Feeding Supplies: Bring bottles, burp cloths, and any pacifiers your baby prefers.
Comfort Items: A portable sound machine, familiar toys, and weather-appropriate items can help keep your baby comfortable while away from home.
Packing the Bag: Save space! Lay supplies on the changing pad, fold the pad over them, and roll everything into a compact bundle.
Fit Check Your Bag: Adjust the amount you carry based on the bag’s capacity and your family’s needs.
Make It Your Own: Your baby will have preferences. Bottles, pacifiers, diapers, and creams may require some trial and error.
Safety: Choose toys carefully and avoid choking hazards.
Chargers: Remember charging supplies for portable devices such as sound machines.
Lets Talk
Diaper bags are one of the most or quite possibly THE MOST essential items that parents need. A well made up and properly stocked diaper bag can prevent unnecessarily stressful situation. For instance, let’s say you are on a road trip the suddenly, your baby takes a MASSIVE dump. You need diapers, wipes, a way to dispose of the diapers, and maybe even a change of clothes. If you hadn’t thought of that ahead of time, you might be in for a tough time. But, a properly prepared diaper bag can help mitigate some of unforeseen circumstances. See also, 'The Glove Trick' for instances when you may forget a trash bag.
In the below image, I have displayed what I would consider the minimum items that should be in the diaper bag. You may need to tailer your bag to your individual needs and circumstances, but this should get you started.

Packing The Bag
This is a lot to fit into a bag, right?!?! Depending on what size bag you picked, you may have a different storage capacity. Let me show you how I packed my bags to make all of my stuff fit!
1) Layout your diaper changing station

2) Fold the changing pad so that the pad covers half or all of the supplies
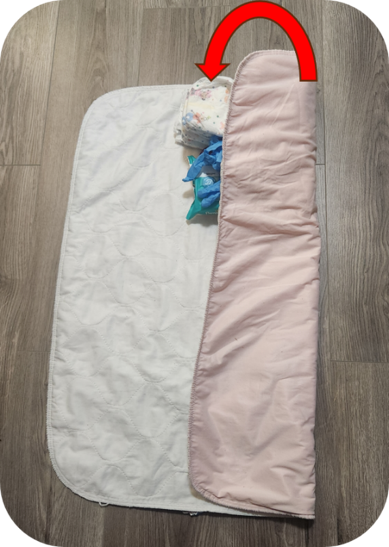
3) Fold in the other side so that it covers the res of the supplies and overlaps the portion in step 2
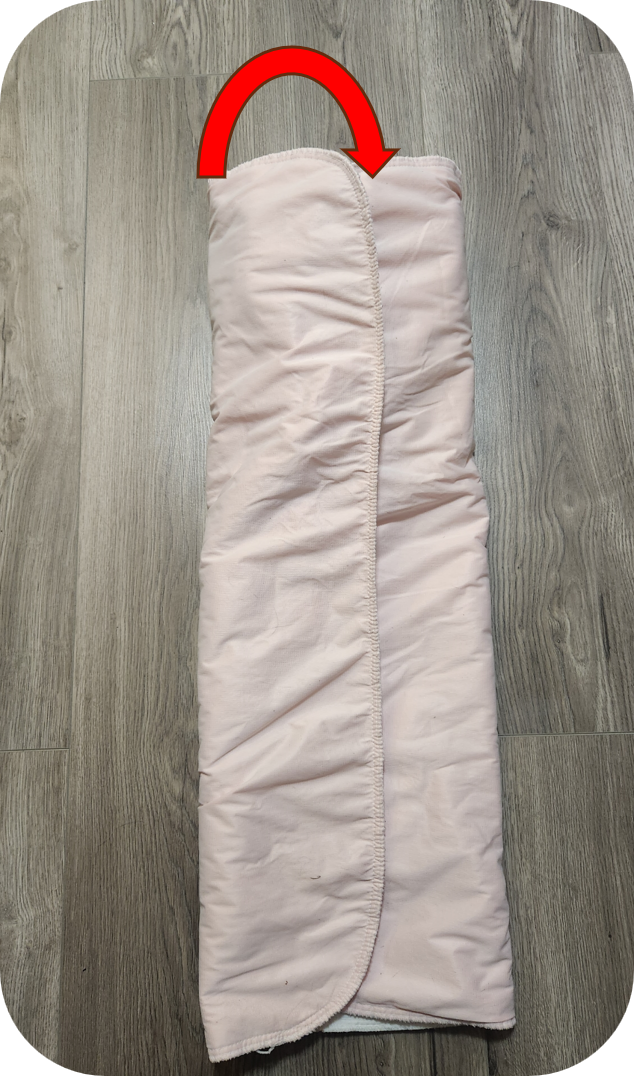
4) Starting from the supplies end, roll the bundle down the length of the pad

5) Keep rolling until you have a nice neat bundle.

Build Your Own Bag!
The below linked items are what I used. I have provided them in a table format so that you can easily print and cross items off the list. You or your baby may have different preferences. You will get to know your child’s preferences pretty quickly, and you may end up needing to switch out some of the below items. When my first child was an infant, she switched bottles three times before settling on her favorite (its worth noting that there may be some trial and error). Choking hazards such as toys should be picked at your own discretion.
Item | Notes |
| |
| |
My favorite for daytime use is the Millie Moon diapers. They fit better and has longer coverage protection. Also they must seemed better quality than most other diapers. | |
We used Desitin Extra Strength as our choice. Some babies may want a different cream. Or, if your child has sensitive skin, then you may want a cream specifically design for sensitive skill. | |
| |
Im going to tell you right now. DO NOT FORGET GLOVES! You are welcome. | |
Another must have! | |
| |
Your baby may prefer a different kind of pacifier. Each baby is different in their preferences, this is just what I used | |
Your baby may prefer a different bottle/bottle nipple. Each baby is different in their preferences, this is just what I used. | |
Bring a charger with you wherever you go. These machines can come in clutch if you are out and about and your baby needs to sleep. | |
Because your clothes don’t need to be the catch all | |
MAKE SURE YOUR TOYS OF CHOICE ARE NOT CHOKING HAZARDS!!!
| |
I liked the baby pit vipers for my kids. Most infants I have met don’t like wearing sunglasses. | |
|

Comments